Rate of Rise — Telling Outgassing from Leaks
Estimated time: 20–25 minutes
Interpret rate-of-rise data to distinguish outgassing from real leaks; describe the diagnostic procedure conceptually. Competency: M02-COMP-02, Indicators M02-IND-02.01, M02-IND-02.03
Orient
In Module 1, you learned that in ISOLATED state (R1-V-ISO closed, R1-V-VENT closed), a slow pressure rise is normal outgassing while a fast rise indicates a problem.
That was a simplified rule. Now you're ready for the full picture.
The rate-of-rise test is the single most important diagnostic tool in vacuum troubleshooting. Rate of rise is how quickly the pressure climbs when the pump is turned off — the steeper the climb, the more gas is entering the system. By watching how pressure rises after isolation — not just how fast, but how the rate changes over time — you can distinguish between outgassing, real leaks, and virtual leaks.
Core Content: The Rate-of-Rise Test
What It Is
A rate-of-rise test is straightforward in concept:
- The system is pumped down to a stable low pressure
- The system is switched to ISOLATED state (both valves closed, pump off)
- The chamber pressure is recorded over time
- The shape of the pressure-versus-time curve tells you what's happening inside
The power of this test is that it separates gas sources by their time behaviour.
Pattern 1: Outgassing (Normal Behaviour)
What you see: Pressure rises, but the rate of rise decreases over time. The curve bends — fast rise initially, then gradually flattening.
Why: Outgassing is a diffusion-limited process. As gas desorbs from surfaces, the remaining gas is trapped deeper in the material and takes longer to reach the surface. The "easy" gas comes off first; the deeply trapped gas comes off slowly.
What it looks like on R1-A:
- Isolate at 0.05 mbar
- After 1 minute: 0.15 mbar (rise of 0.10 mbar/min)
- After 2 minutes: 0.22 mbar (rise of 0.07 mbar/min)
- After 5 minutes: 0.35 mbar (rise of 0.03 mbar/min)
- Rate is decreasing → outgassing
Conclusion: Normal. The system is tight. The gas load is coming from surfaces and decreasing as expected.
Pattern 2: Real Leak
What you see: Pressure rises at a constant rate. The curve is a straight line.
Why: A real leak connects the chamber to atmosphere — an unlimited gas reservoir. The leak provides a constant flow of gas, so the pressure rises at the same rate whether you wait 1 minute or 30 minutes.
What it looks like on R1-A:
- Isolate at 0.05 mbar
- After 1 minute: 0.55 mbar (rise of 0.50 mbar/min)
- After 2 minutes: 1.05 mbar (rise of 0.50 mbar/min)
- After 5 minutes: 2.55 mbar (rise of 0.50 mbar/min)
- Rate is constant → real leak
Conclusion: Problem. There is an unintended gas path from atmosphere into the chamber. This needs to be found and fixed.
Pattern 3: Virtual Leak
What you see: Pressure rises, the rate of rise decreases (like outgassing), but the behaviour persists longer than expected — and may show an unusual pattern as the trapped volume empties.
Why: A virtual leak is a trapped pocket of gas (not connected to atmosphere). As the trapped volume releases its gas, the pressure equalises and the leak slows down. Eventually, the virtual leak empties completely and the rate of rise drops to the background outgassing level.
What it looks like: The initial behaviour can mimic outgassing, which makes virtual leaks difficult to diagnose from a single rate-of-rise test. They're typically identified through repeated pump-down and isolation cycles — a virtual leak produces the same pattern every time, while true outgassing decreases with each cycle.
Conclusion: Requires investigation. Virtual leaks are design or assembly issues (trapped volumes), not seal failures.
You can now describe the three rate-of-rise patterns (outgassing, real leak, virtual leak) and explain what each looks like on R1-A. The decision framework below organises this into a step-by-step diagnostic you can apply to any rate-of-rise data.
Rate-of-Rise Decision Framework
RATE-OF-RISE TEST INTERPRETATION

1. Is the rate of rise CONSTANT over time?
   → YES: Suspect REAL LEAK
   → NO (rate decreases): Go to step 2

2. Does the decreasing rate match expected outgassing?
   → YES (0.01–0.5 mbar/min, decreasing steadily): Normal OUTGASSING
   → NO (rate is higher than expected, or pattern repeats
     identically cycle after cycle): Suspect VIRTUAL LEAK
     or unusual contamination

3. Is the overall rate of rise very high (>1 mbar/min at rough-vac pressures)?
   → YES: Suspect GROSS LEAK — escalate immediately
   → NO (<1 mbar/min): Continue monitoring and document trend

Always record: starting pressure, time intervals, gauge readings,
and trend direction.
The Three Rate-of-Rise Signatures
The chart below is the single most important visual in this module. It places all three rate-of-rise patterns on one set of axes so you can compare their shapes directly. Focus on the slope of each curve — that slope is the diagnostic signal.
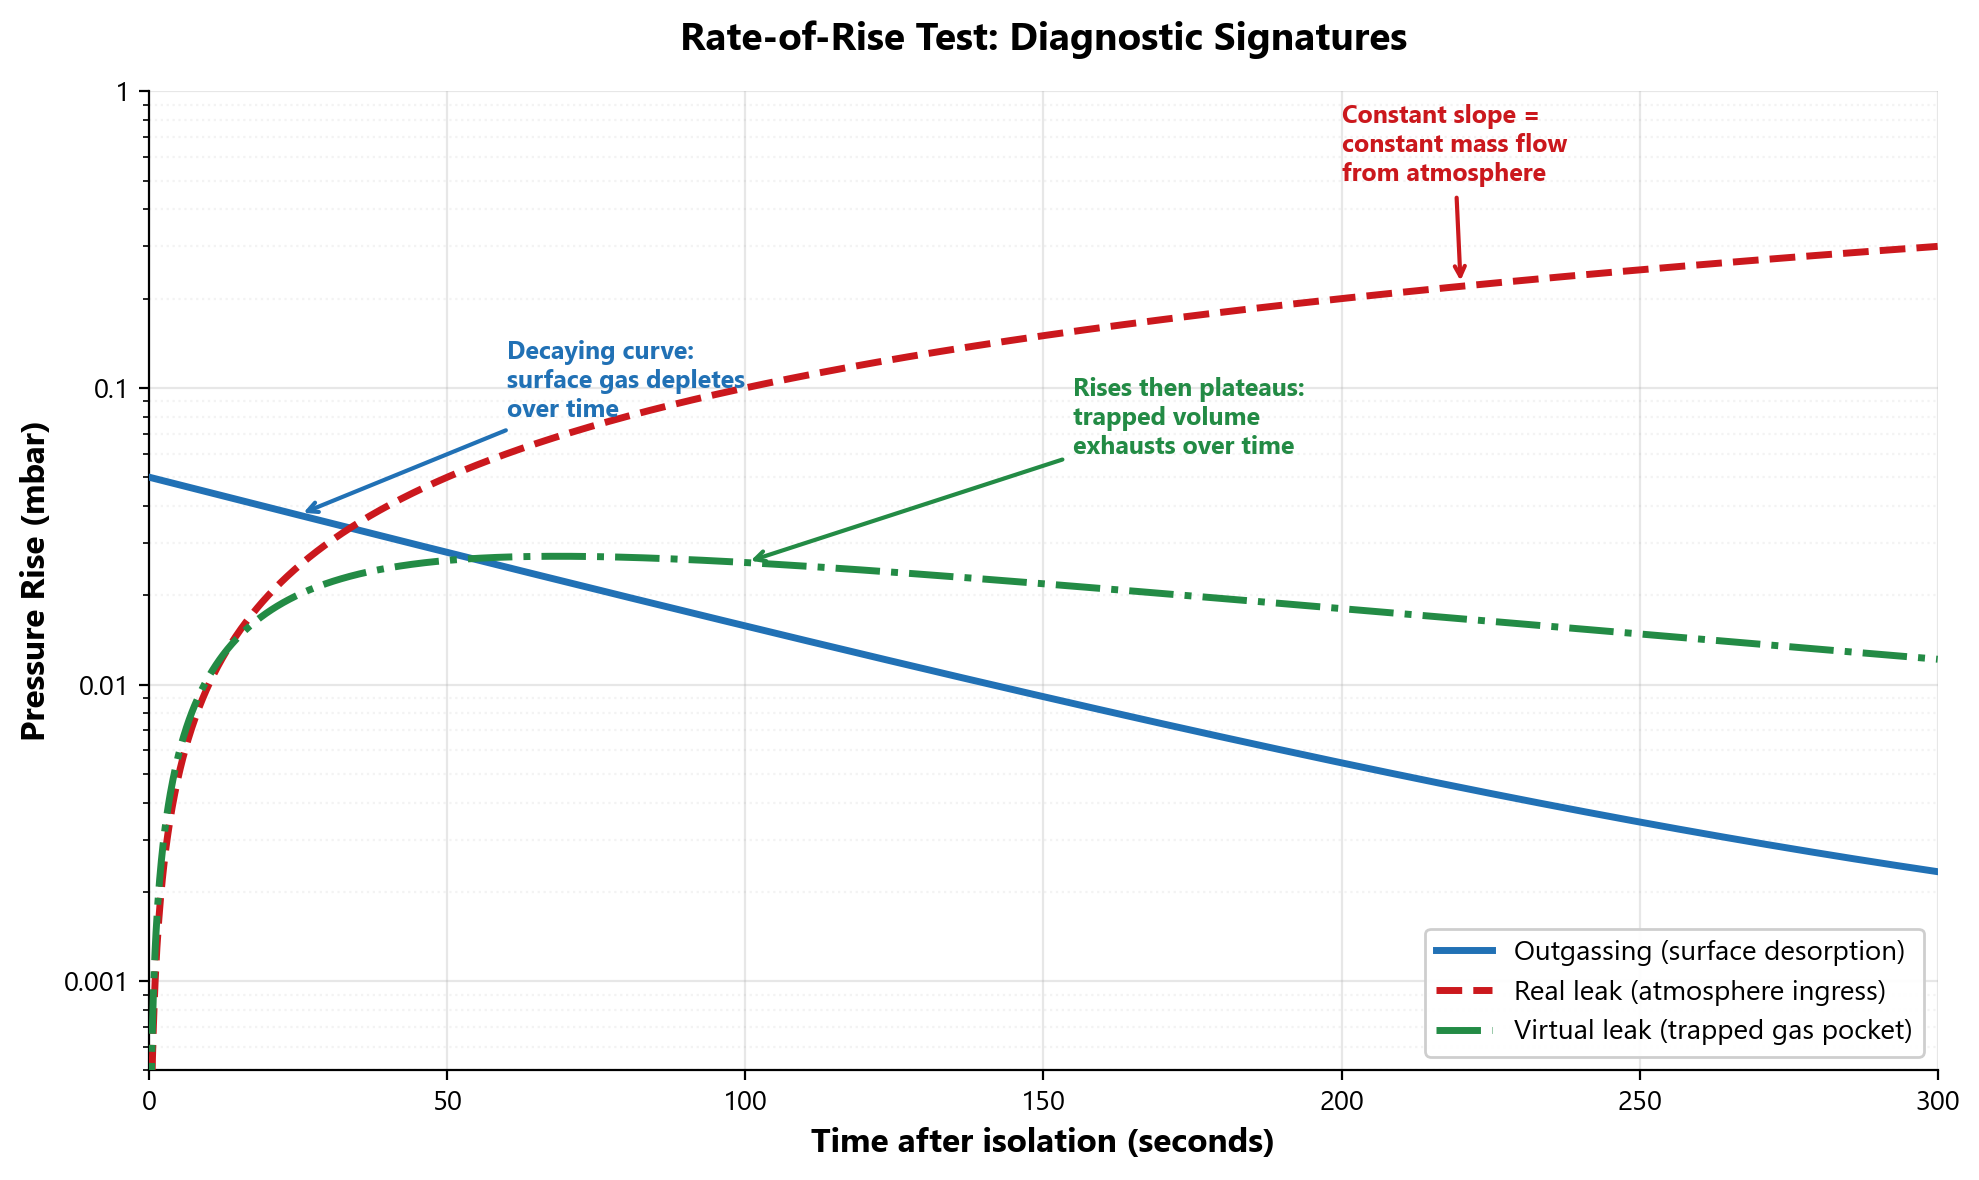
The critical observation: the outgassing curve bends because the gas source is depleting, while the real-leak line stays straight because atmosphere is an unlimited reservoir. If you can identify that distinction on a real data set, you have the core diagnostic skill of Module 2.
Scenario: R1-A has been roughed down to 0.08 mbar. The operator isolates (R1-V-ISO closed, R1-V-VENT closed, pump off). The following readings are recorded on R1-G-CH:
| Time (min) | R1-G-CH (mbar) | Rise since last reading (mbar) | Rate (mbar/min) |
|---|---|---|---|
| 0 | 0.08 | — | — |
| 1 | 0.22 | 0.14 | 0.14 |
| 2 | 0.33 | 0.11 | 0.11 |
| 5 | 0.52 | 0.19 | 0.063 |
| 10 | 0.68 | 0.16 | 0.032 |
Interpretation: The rate of rise is decreasing (0.14 → 0.11 → 0.063 → 0.032 mbar/min). This is the outgassing pattern.
The system is tight — the gas load is coming from surfaces, not from a leak. No action required beyond documenting the result.
What if the rates had been constant? If every row showed ~0.14 mbar/min, that would be a linear rise — consistent with a real leak at approximately 0.14 mbar/min. That would warrant investigation and escalation.
If you would like to see a rate-of-rise test performed on real equipment, the short video below walks through the procedure and shows gauge readings changing in real time. Watch for the moment after isolation when the operator reads successive pressure values and determines whether the slope is constant or decreasing — that is the diagnostic decision point you have just studied.
[VIS-M02-VID-001] | P3-NICE TO HAVE | External Video
"External video — rate-of-rise leak testing demonstration on a rough vacuum system"
VISUAL PENDING PRODUCTION
This video is supplementary — the concepts and decision framework above are the assessable content. The video simply lets you observe the same patterns on physical equipment.
Misconception: If pressure rises after isolation, the system must be leaking.
Reality: Every vacuum system shows some pressure rise after isolation. The question is never "does it rise?" but "how does it rise?" A decreasing rate of rise is normal outgassing.
A constant rate of rise is a leak. The pattern, not the fact of the rise, tells you the diagnosis.
What You Can Now Do
By the end of this section, you can:
- Describe the rate-of-rise test procedure conceptually
- Interpret a rate-of-rise curve to distinguish outgassing from a real leak
- Recognise the virtual leak pattern and explain why it's difficult to diagnose
- Use the decision framework to classify rate-of-rise observations
- Document rate-of-rise data clearly (time, pressure, rate, trend)
Next Steps
You now understand gas load sources and how to tell them apart. The next lesson focuses on a specific problem: contamination. What happens when the wrong things get into a vacuum system — and how do you recognise it?